Problem:
When implementing various promotional activities, we often need to create very complex animation effects, such as card draws or prize wheels.
However, each traditional web animation solutions have their shortcomings. Making our development process very painful. Here, we provide a comparison of some options:
| Type | Development Cost | Resource Size | Effect |
|---|---|---|---|
| CSS | High communication cost, requires front-end to implement keyframes one by one 😭 | Small | Limited effects |
| Image Frame Sequence | Low, UE directly exports resource images | Limited by the image compression algorithm, resources are too large 😓 | Can achieve any designer effect |
| Lottie | Low, UE directly exports JSON files and transformed into animation | Small | Only supports vector animation |
Solutions
Currently, I provide React open-source components for this animation solution. Feel free to check out the repository, and if you find it helpful, please give it a star. 😊
To build high-performance web animations at zero development costs, we started with the following initial design plan:
- Construct an alpha transparency channel for video resources that do not have a transparent channel.
- Use the video tag to play the video, and use the canvas tag to render the video frame by frame.
Our goals are:
There were no similar approaches in the industry. To verify the feasibility of the solution, I conducted detailed research on implementation plans and performance metrics.
Implementation
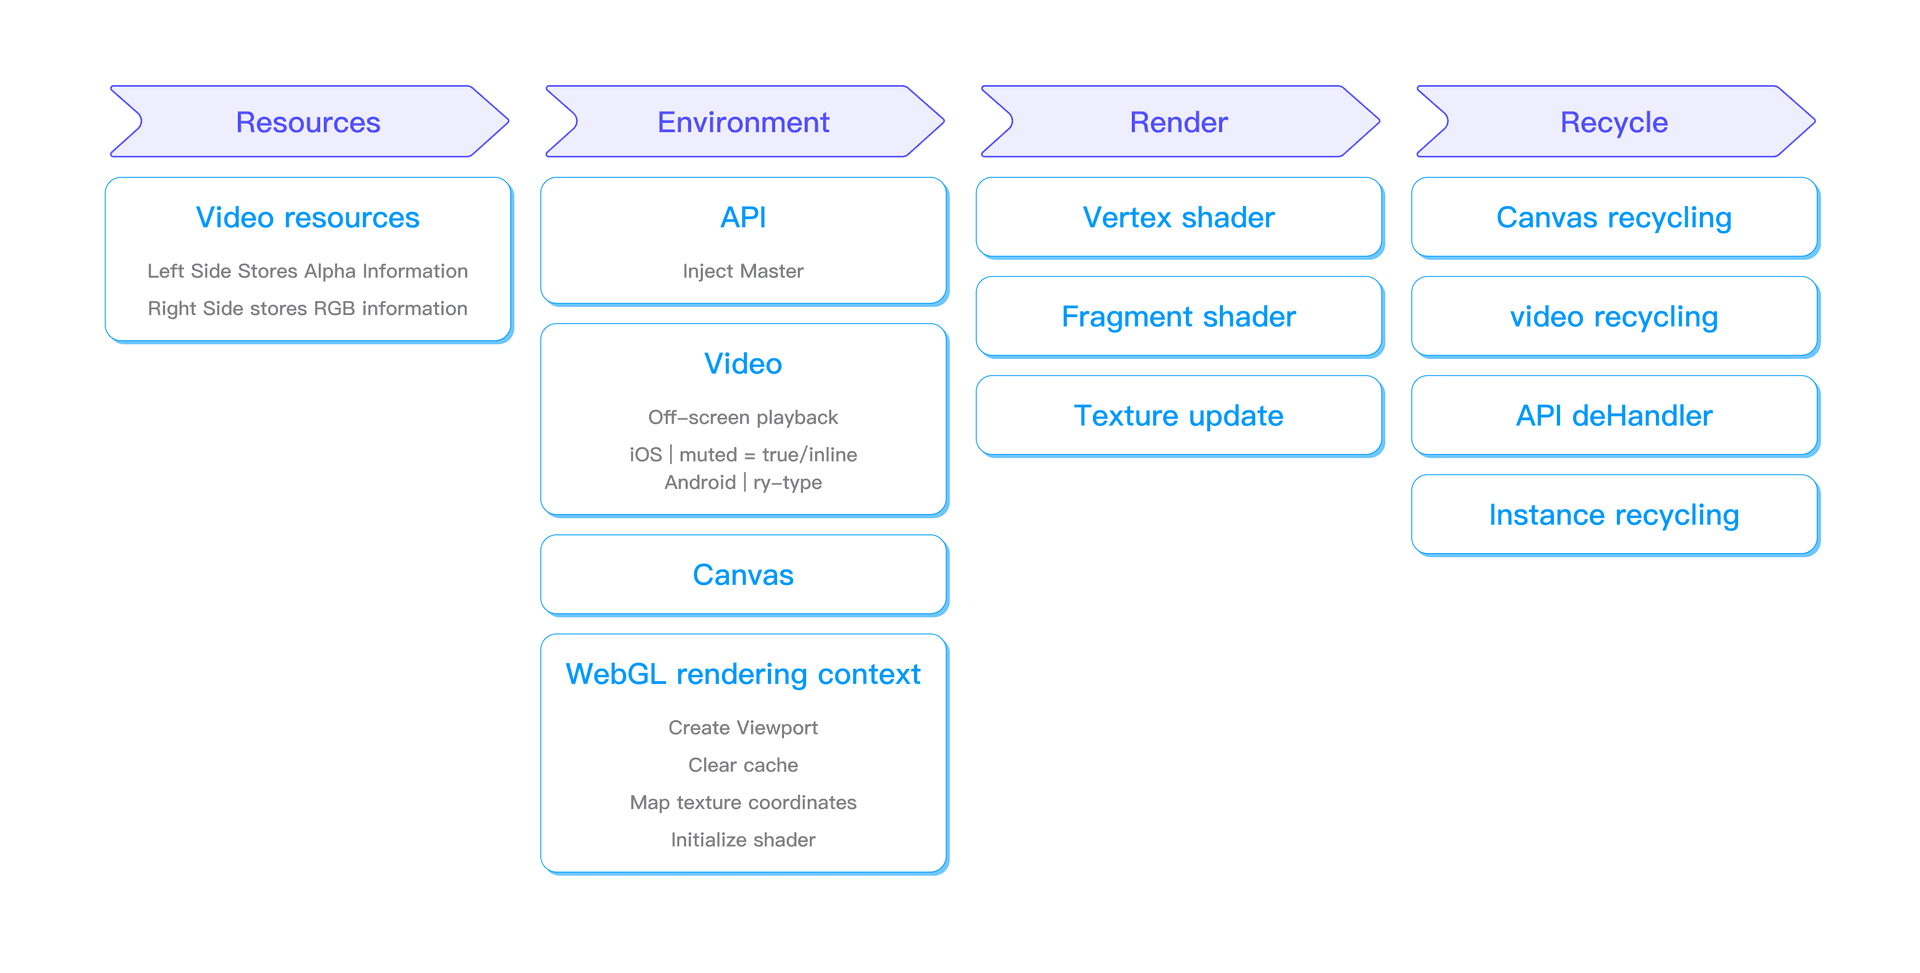
Here is the general implementation process of the component. I have divided it into four main steps:

- Resources: After the designer provides the animation files, the resources are preprocessed. The final result is an MP4 file with the animation's alpha channel information on the left side and the RGB channel information on the right side.
- Click "Read More on Twitter" to preview the original resource example.
- Environment: The component sets up the drawing environment. Defines the size of the OpenGL rendering window and ensure that data from the previous rendering iteration is cleared at the start of each new iteration.
- Render: This step primarily focuses on shader processing.
- Recycling: After the component is destroyed, its resources are recycled by different kind of ways.
Render
WebGL is required in order to construct the alpha transparency channel of video. This process is the most challenging part, Let's talk about it.
From the above example, We can see that the video is divided into two parts, the left part is grayscale, and the right part is colored. The grayscale values on the left can be directly used as alpha channel data, and combined with the RGB data on the right to form RGBA information, creating a texture with a transparent channel that can be drawn to the canvas.
Below is the WebGL processing code. Before explaining this code, let's first clarify some basic WebGL concepts.
Shaders
Shaders are programs that run on the GPU. They can't communicate with each other directly. They are programs that transform input into output and are used for rendering effects. The vertex shader processes each vertex's position and attributes while the fragment shader handles the rendering and coloring of each pixel.
Varying
Varying type variables are used to pass data from the vertex shader to the fragment shader, as OpenGL cannot directly pass data to the fragment shader. To pass data, define a variable starting with
varyingbefore themainfunction in the vertex shader.
Texture Coordinates
For example, to map a texture to a triangle, we need to specify which part of the texture corresponds to each vertex of the triangle. This way, each vertex is associated with a texture coordinate, indicating which part of the texture image to sample. The texture coordinates on the x and y axes range from 0 to 1 (we are using 2D texture images).
The texture coordinates of the triangle look like this:
GLfloat texCoords[] = {
    0.0f, 0.0f, // bottom left
    1.0f, 0.0f, // bottom right
    0.5f, 1.0f // top center
};
Let's take a look at the complete code:
// a_Position: Represents the input vertex position.
// v_TextureCoord: Represents the texture coordinates passed to the fragment shader.
// u_Texture: Represents the texture sampler in the fragment shader.

// Vertex shader code
const vertexShaderSource = `
attribute vec2 a_Position;
varying vec2 v_TextureCoord;

void main() {
    // Map coordinates from (-1, 1) to (0, 1) for texture sampling
    v_TextureCoord = (a_Position + 1.0) * 0.5;

    // Set vertex position
    gl_Position = vec4(a_Position, 0.0, 1.0);
}`;

// Fragment shader code
const fragmentShaderSource = `
precision highp float;
uniform sampler2D u_Texture;
varying vec2 v_TextureCoord;

void main() {
    // Sample RGB values from the right side of the texture
    vec3 color = texture(u_Texture, v_TextureCoord * vec2(0.5, 1.0) + vec2(0.5, 0.0)).rgb;

    // Sample alpha values from the left side of the texture
    float alpha = texture(u_Texture, v_TextureCoord * vec2(0.5, 1.0)).r;

    // Set fragment color with RGB and alpha
    gl_FragColor = vec4(color, alpha);
}`;
As we can see, first we set up the vertex shader to map the texture coordinates on the video, then we set up the fragment shader. Using GLSL's built-in function texture, we get the texture color at the corresponding position, sampling the RGB information from the right side of the texture and the grayscale information from the left side, and completing the combination.
Preview
Here is our implementation process. This solution has been used in many major Baidu promotional events, influencing billions of page views. It has been tested for compatibility and performance across various devices, proving its robustness.
Click the Read more on Twitter to view the complete effect.
Alternatively, visit this page to preview.
We hope this solution can also assist you, reducing your development pain and enabling you to create even more perfect web pages.😁